The double bottom and the double top are the simplest reversal patterns on a chart. Price tests a level, bounces, comes back to the same level, and fails to break it a second time. Almost every trader can spot them, which is exactly why they are so often traded too early.
Two touches of a level are not a pattern yet. They are a range. The pattern only becomes a trade when price closes through the neckline, the level between the two tests. This guide shows how to draw the pattern, when it is confirmed, how to set the target and the stop, and walks through a full example.
What the pattern looks like
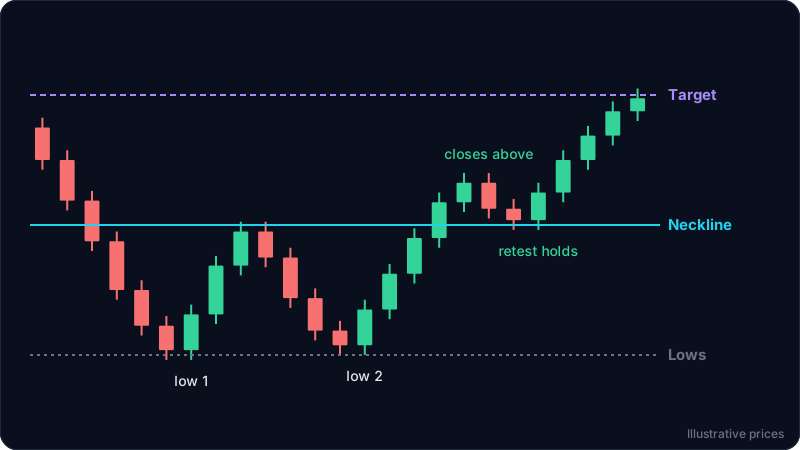
A double bottom forms after a downtrend:
- First low. Sellers push price to a low and buyers step in. Price bounces.
- Neckline. The bounce stalls at a high. That high is the neckline.
- Second low. Price falls back to the area of the first low but does not close meaningfully below it. Sellers had a second chance and could not make a lower low.
- Break. Price rallies and closes above the neckline. Now the pattern is confirmed.
A double top is the mirror image after an uptrend: two highs at about the same price, a neckline at the pullback low between them, and a close below that neckline to confirm it.
The logic is about trend structure. A downtrend is a series of lower lows. When the second low fails to go lower, the downtrend has stalled. When price then closes above the neckline, it has made a higher high too, which is the first step of an uptrend. See trend vs range markets for more on how structure changes.
What makes the second test valid
The two lows do not need to be at the exact same price. A few practical rules:
- Same zone, not same tick. The second low should land in the same support zone as the first. A small undercut of the first low, followed by a close back above it, is common and can even strengthen the pattern, because it traps sellers who shorted the break.
- Time between the lows. If the two lows are only a couple of candles apart, it is noise. A clear bounce to a neckline between them matters more than the exact number of candles.
- Weaker selling on the second test. Smaller red candles or a quick rejection wick at the second low suggest sellers are running out of steam. It is a clue, not a requirement.
- Context. A double bottom at a major support zone on the daily chart carries more weight than one in the middle of nowhere on a 5 minute chart. Our guide on support and resistance for beginners shows how to find those zones.
When the pattern is confirmed
The confirmation is a candle close beyond the neckline on the timeframe you trade. A wick that pokes above the neckline and closes back below it is not a break. It is the same rule as in breakout vs fakeout.
After the break, two entry styles are common:
- On the close. Enter when the candle closes above the neckline. You catch every move, but you also catch the fakeouts.
- On the retest. Wait for price to come back to the neckline from above and hold it, then enter on the next bullish close. You miss the moves that never come back, but your stop can be tighter and the old resistance has shown it now acts as support.
The measured target
Measure the height of the pattern: the distance from the lows to the neckline. Add it to the neckline for a double bottom, or subtract it from the neckline for a double top.
- Double bottom target = neckline + (neckline - lows)
- Double top target = neckline - (highs - neckline)
Treat it as a planning level, not a promise. If there is a strong resistance zone before the target, that zone is a more realistic first target.
Where the stop goes
Two common places:
- Below the retest low (for a double bottom), with a small buffer. If price falls back under the neckline and below the retest, the break has failed.
- Below the second low. The pattern is fully invalid there. This stop is safer from noise but much wider, which often ruins the risk reward ratio.
Pick the stop first, then size the position from the stop distance. See how to set a stop loss.
Worked example
These numbers match the diagram above. Prices are illustrative.
- First low: price falls from 114 to a low at about 99.7 and bounces.
- Neckline: the bounce stalls near 108.
- Second low: price falls back to about 100, holds, and rallies.
- Confirmation: a candle closes at 109.4, above the neckline.
- Retest: price dips to 107.7 intraday, closes at 108.3, still above the neckline, and the next candle closes at 110.
- Entry: about 110, on the close that shows the retest held.
- Target: height is 108 - 100 = 8, so the measured target is 108 + 8 = 116. Reward is 6 per unit.
- Stop option A, below the retest low: 107.2. Risk 2.8, ratio about 1 to 2.1.
- Stop option B, below the second low: 99.5. Risk 10.5, ratio about 1 to 0.6. Most traders would skip the trade with that stop.
The risk reward calculator checks those ratios, and the position size calculator turns the stop distance into a size for your account.
The double top works the same way upside down: entry on a close below the neckline or on a failed retest from below, stop above the retest high, target the neckline minus the pattern height.
Double bottom vs head and shoulders
Both are reversal patterns with a neckline. The inverse head and shoulders has three lows with the middle one lowest; the double bottom has two lows at about the same price. The trading rules are almost identical: wait for the neckline close, use the retest, measure the height for the target.
Common mistakes
- Buying the second low before the break. It might hold, or it might be the start of the next leg down. Until the neckline breaks, it is a range.
- Calling every two touches a pattern. Two bumps in a tight, choppy range mean nothing. Look for a clear trend before the pattern and a real bounce between the lows.
- Using a wide stop and the same position size. If the stop is below the second low, the size must be smaller. See position sizing for a $1,000 account.
- Ignoring the higher timeframe. A double top on a 15 minute chart inside a strong daily uptrend is often just a pullback. Check multiple timeframes.
FAQ
Is a double bottom bullish?
It is a bullish reversal pattern once price closes above the neckline. Before that, two lows at the same level only tell you there is support. No pattern guarantees a move, and we do not quote success rates because they depend on the market, the timeframe and how the pattern is defined.
What is a triple bottom?
The same idea with three tests of the low instead of two. The rules do not change: the neckline is the highest point between the lows, and the confirmation is a close above it.
What if the second low breaks below the first?
A small undercut that closes back above the first low is common. A clear close below the lows means the pattern failed and the downtrend continues.
Does it work on crypto, forex and gold?
The structure works on any chart and any timeframe. It is cleaner on the 4 hour and daily charts than on very short timeframes, where noise creates many fake double tops and bottoms.
Try it on your own chart
ChartEdge AI reads a chart screenshot and gives you the trend, the key support and resistance zones, the pattern it sees, and a plan with entry, stop and targets. Use it to check whether the neckline on your chart has really broken before you act. Try it with 3 free analyses, no card required. Educational only, not financial advice.